
In today’s digital-first world, visuals speak louder than words. Whether you’re an e-commerce brand, a professional photographer, or a social media creator — photo editing plays a vital role in how your audience perceives your work.
But here’s the catch — even a small photo editing mistake can make a professional photo look artificial or poorly done. Over-retouching skin, incorrect color tones, or unrealistic lighting can quickly ruin a great shot.
At Magnum Photo Editing, we’ve seen countless images where great photography was overshadowed by poor editing. The good news? These common issues are completely fixable — if you know how to spot and correct them.
In this blog, we’ll uncover the Top 5 most common photo editing mistakes, explain why they happen, and share professional photo retouching tips on how to fix them effectively.
1. Over-Retouching the Skin
– The Mistake
One of the most frequent photo editing mistakes we see is over-retouching skin. Many editors rely too heavily on smoothing tools, resulting in plastic-looking skin that loses all its natural texture.
This issue usually occurs when editors try to eliminate blemishes or wrinkles completely. While it might seem flattering, it ends up making the subject look unnatural or airbrushed.
Why It Happens
Beginners often think “flawless” means perfectly smooth, but true beauty lies in realistic details — pores, fine lines, and subtle imperfections that make a face human.
– How Magnum Photo Editing Fixes It
At Magnum, we focus on realistic skin retouching using frequency separation and dodge & burn techniques.
- We preserve skin texture while removing distractions like acne, scars, or redness.
- Instead of global smoothing, we retouch area by area, maintaining tone consistency.
- Our editors use non-destructive methods, so original details remain intact.
Pro Photo Retouching Tip
Use a low-opacity brush for healing and cloning. Zoom out frequently to check if the retouching looks natural at full view.
2. Incorrect Color Correction & White Balance
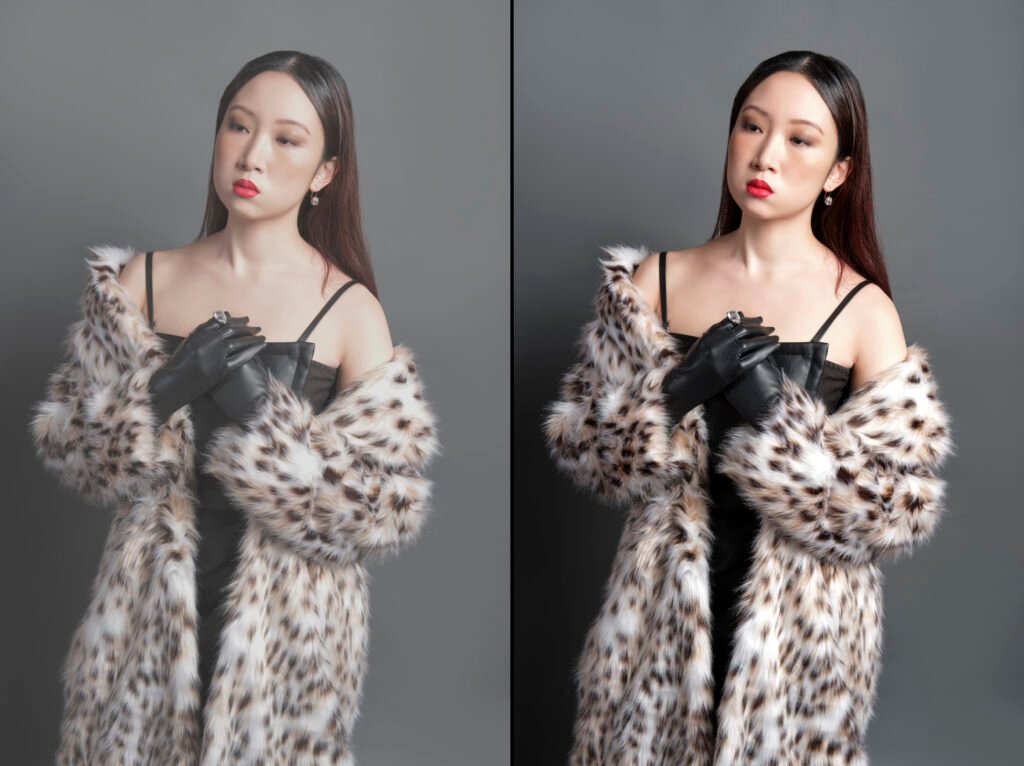
– The Mistake
A beautiful photo can look dull or overly warm/cold if the white balance or color tones are off. This happens when editors don’t calibrate their screens or fail to adjust lighting properly during post-processing.
For example:
- Skin tones might appear too orange or green.
- Product colors might not match the real item.
- Backgrounds can look inconsistent across an image gallery.
Why It Happens
Every light source — daylight, tungsten, fluorescent — has a different color temperature. When editing, using an uncalibrated monitor or auto settings can distort true tones.
How Magnum Photo Editing Fixes It
At Magnum Photo Editing, color correction is a multi-step process:
- We analyze the lighting source and camera profile.
- Adjust white balance manually for true-to-life tones.
- Apply HSL (Hue, Saturation, Luminance) corrections to enhance mood without distorting realism.
- Maintain color consistency across all product or portrait series.
Pro Photo Retouching Tip
Always check your edits on both calibrated and uncalibrated screens to ensure your colors look consistent everywhere.
3. Overexposure or Underexposure
– The Mistake
Another common photo editing mistake involves incorrect exposure levels.
- Overexposed images lose highlights — skies turn white, faces appear washed out.
- Underexposed photos look dull and shadowy, hiding important details.
Why It Happens
Editors sometimes push brightness or contrast too far to make photos “pop.” But without balancing highlights and shadows, the image loses depth.
How Magnum Photo Editing Fixes It
We rely on advanced exposure correction techniques:
- Recover highlight details using RAW files.
- Adjust shadows and blacks selectively for balanced contrast.
- Apply local adjustments to bring out subject focus.
- Use tone curves for controlled brightness rather than global exposure changes.
Pro Photo Retouching Tip
Always edit using the histogram as your guide. It ensures your whites and blacks stay within range for print and web.
4. Poor Background Removal or Inconsistent Edges
The Mistake
Background removal sounds simple, but when done hastily, it leads to jagged edges, halo outlines, or unnatural shadows. These errors make even high-quality product photos look amateur.
Why It Happens
Many editors rely solely on automatic tools like Photoshop’s “Select Subject” or AI cutouts. While these tools are helpful, they rarely produce clean, professional edges on their own.
How Magnum Photo Editing Fixes It
Our team uses a combination of manual and AI-assisted background removal for precision.
- We refine edges manually, especially around hair, fur, or transparent objects.
- Add realistic drop shadows or reflections to preserve natural depth.
- Ensure the subject blends seamlessly on new or white backgrounds.
This attention to detail makes our work stand out in eCommerce product photo editing.
Pro Photo Retouching Tip
Always zoom in around the edges and use feathered selections for soft transitions between subject and background.
5. Ignoring Color Harmony and Overall Tone
The Mistake
Many editors focus too much on fixing details but forget the overall color harmony — the way all tones, hues, and contrasts work together in a composition.
This results in images that feel flat, overly saturated, or moodless.
Why It Happens
A lack of understanding of color theory or overreliance on presets can lead to poor tone management. What looks good on one image might look harsh on another.
How Magnum Photo Editing Fixes It
We emphasize color balance and mood control in every photo:
- Apply selective color grading for consistent visual identity (especially for brands).
- Use LUTs or custom color profiles suited for each lighting scenario.
- Fine-tune contrast and mid-tones for visual depth and mood consistency.
Our editors ensure the final image feels cohesive, natural, and visually appealing.
Pro Photo Retouching Tip
Instead of relying on filters, study professional color grading techniques to enhance mood while
Bonus: Common Beginner Mistakes in Photo Editing
Here are a few smaller yet frequent photo retouching mistakes many beginners make:
- Oversharpening leading to noise and artifacts
- Cropping too tightly, losing composition balance
- Ignoring file format and compression, causing image degradation
- Skipping monitor calibration, resulting in color mismatch on client screens
- Not saving different versions, making revisions difficult
At Magnum Photo Editing, our editors follow strict quality protocols to avoid these issues and ensure every photo meets professional standards.
Professional Photo Retouching Tips (Quick Recap)
- Always work on non-destructive layers.
- Use masks instead of erasing directly.
- Keep color and exposure consistent across series.
- Step away from your edit for a few minutes — fresh eyes catch hidden mistakes.
- Use natural lighting references when editing portraits.
Why Choose Magnum Photo Editing
When you work with Magnum Photo Editing, you’re not just hiring an editor — you’re partnering with a team that understands visual storytelling.
We specialize in:
✅ High-end portrait retouching
✅ Product image enhancement for eCommerce
✅ Background cleanup and shadow creation
✅ Color correction and exposure balancing
✅ Photo restoration and manipulation
Every project undergoes quality checks and manual retouching to ensure natural, detailed, and professional results.
Conclusion: Turning Mistakes into Masterpieces
Even the best photographers make mistakes during post-processing — the difference lies in how those mistakes are corrected.
By identifying and fixing these common photo editing mistakes, you can transform your photos from average to exceptional.
At Magnum Photo Editing, we combine artistic precision with advanced tools to ensure every image looks authentic, balanced, and beautifully edited.
If you’re ready to level up your photos,
Contact Magnum Photo Editing today for flawless, professional retouching services.